
Two fundamentally different ways to do Bridge pose
18Am I the only one who finds that sometimes detailed instructions on how to get yourself into a pose sound contradictory? For example, I was checking out the Yoga Journal’s page on how to do Bridge pose and came across the following.
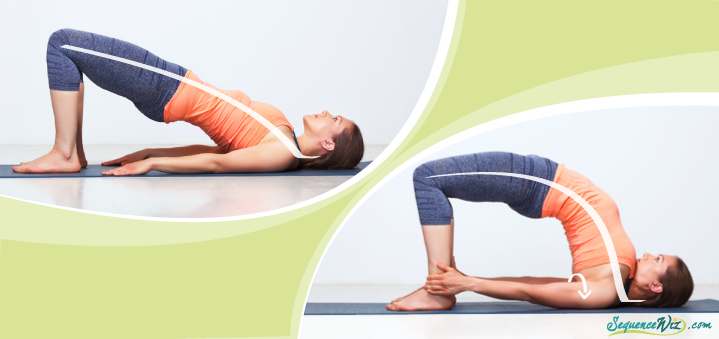
 The video suggests that you “Tuck the shoulders underneath your chest” when you lift up into the pose, while the description says that you should “broaden the shoulder blades”. The curious thing here is that you cannot do both. Tucking the shoulders underneath adducts your shoulders moving the shoulder blades closer together. If you try to widen the space between the shoulder blades, you will move the arms apart, which means that the arms will end up next to your body, not underneath. So if you are asking your students to do both they might find it rather confusing and frustrating.
So which way is correct then? Well, it depends on what it is that you are trying to accomplish, and it has very little to do with whether the student is a “beginner” or “advanced”. In my tradition we usually do not tuck the arms under but instead focus on widening the space between the shoulder blades for several reasons:
1. Tucking the arms under can create a lot of upper back tension.
2. Tucking the arms under (if one is able to do it) helps the chest to lift higher, but it also means that it creates a stronger pull on the neck and the areas around the collarbones, which can be too much for many students.
3. Bridge pose is an excellent opportunity to mobilize the shoulders, which means that you can do all sorts of arm movements to loosen up the neck and shoulders.
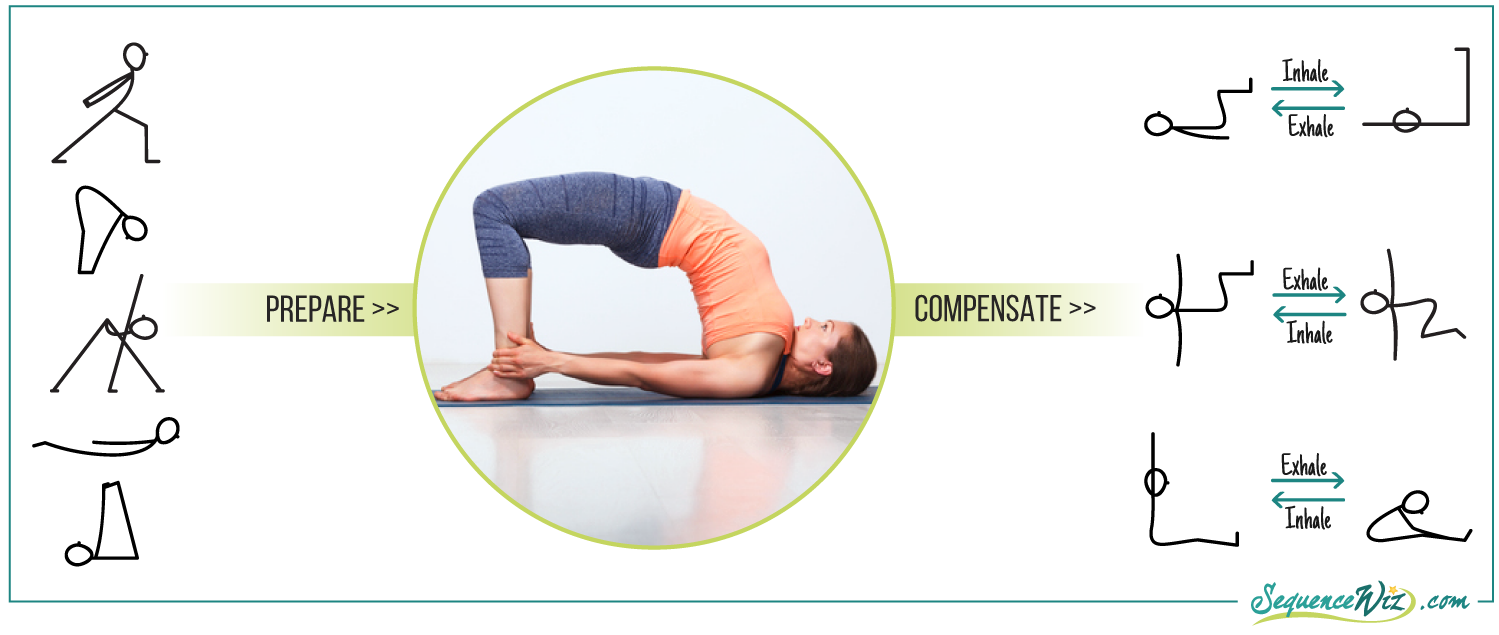
With that said, you COULD make Bridge pose one of your core poses and spend some time working on it. You could even tuck the shoulders underneath, if your goal is to contract the muscles of the upper back, actively stretch the chest and the back of the neck. Then afterwards you would need to spend sometime compensating for the intensity of the pose, stretching the upper back, mobilizing the neck and loosening up the shoulders.
 That is why the way we instruct a pose can be different from one situation to another. It depends on:
– What it is that we are trying to accomplish;
– Where the pose is within the sequence;
– Whether it is used as one of the core poses or a compensation posture;
– What came before it and what comes after;
– Who you are teaching it to.
All those factors come into play when we design a sequence and should be considered by the teacher. It might seem daunting (am I supposed to teach the pose differently every time?!), but in reality it helps to keep you engaged, makes your instruction fresh and interesting AND gets your students more involved and present with what they are doing.
![]() [jetpack_subscription_form]
[jetpack_subscription_form]


Thank you Olga,
The advantage to our training is the variety of ways to utilize poses. When we bring this to our students it transforms their practice.Thank you for sharing.
Georgeanna
I love this!
I was wondering the other day whether you offer any CPD courses to yoga teachers- in person or online?
I was wondering the same thing as Vanessa about online CPD courses! Most courses in Australia are city-based, making it harder for us country folk to keep up to date. That’s why resources such as your website, Olga, are so invaluable.
Thank-you for another well-supported article
Hi Vanessa! I am planning to do some on-line courses for yoga teachers and I open open to suggestions on topics!
Great idea, Olga! I think anatomy can be found in many other sources, too. What would be really helpful in my opinion are topics such as:
– building sequences with examples, e.g. no shoulder stand/plow pose and then immediately fish pose
– going through some poses topic based
– worksheets / graphics are great to make it more visual, sometimes video content might be helpful too
– further vini yoga topics you found valuable
Olga! Always helpful! I love your wisdom, explanation and your colorful articles! Thank you so much & greetings from Vietnam! I tried your “ihunch” routine with students here and they all love it!! big hug, Sandra
Happy to hear it Sandra! It’s awesome to hear from you as you travel the world – I almost feel like I am out there with you! 🙂
Thank you, it comes just in time. The setu bandha is too often in use, and your variations are especially handy for working with not-so-young students. Even if somebody HAS shoulder problems, he can be introduced this way to a half-bridge! What’s lacking now, is your-way-instructions for a common “tuck in the shoulders” performance. Will you turn to it, too?
Hi Alexander! I wasn’t planning on giving any additional instructions on how to tuck the shoulders under simply because I almost never teach the Bridge pose that way. I find that it puts too much stress on the neck and upper back for no good reason (going deeper into any pose is of no interest to me, and there are better ways to stretch the chest). But if somebody does want to teach it that way then the link to the Yoga Journal website I provided gives detailed instructions on how to do it (although, like I said in the post, we cannot tuck the shoulders under AND widen the upper back at the same time 🙂 ) I hope it helps!
I think that there are several ways to do bridge pose–at least as regards the low back. These include coming up/going down in flexion, extension or neutral. I often hear the instruction to “peel your vertebrae up (and down) one at a time”. I am calling that type of movement low back extension and it requires a lot of buttock muscle work. One can also come up and down in lumbar spine flexion–which requires a lot of work by the hamstrings. I personally like to work from neutral, emphasizing the visualization of the groins reaching toward the ceiling. That balances the buttock/hamstring effort and protects the low back. For fun you can also go up in flexion down in neutral, etc, etc. etc. Thanks for all the shoulder/neck ideas and the thoughtful post.
Hi Sharon, thank you for your comment! Personally, I like the “roll up one vertebrae at a time” instruction because I find that it teaches the student how to articulate the spine better and how to work with pelvic-lumbar relationship. And for sure, there are many ways to guide students into Bridge pose depending on where we want to place the emphasis.
Agree, love going up + down sequentially thru the spine. Full bridge w/shoulders tucked as always given me thoracic + cervical issues. As for Sharon’s version of groins reaching…no way for this sacrum + lower lumbar, prefer using a block if I want to use adductors + keep my femur bones “neutral” not rolling up to the ceiling.
I think that this is what the conscious yoga practice is ultimately about – figuring out which way is best for YOU.
Wow, this is great! I’ve been practicing yoga for over 15 years and finished my first teacher training last fall, yet sometimes, I feel as if I’ve gone backwards in poses. Bridge is one–I used to really like it, but over time, I’ve found that I really don’t enjoy tucking my shoulders under and especially not interlacing my hands. But now I know why! My upper back, shoulders, and neck always tend to be quite tense, so it sounds like I’ve been probably only doing myself a disservice practicing it this way. I may never practice it or teach it this way again! 🙂
This is great Beth! My teacher always asks: Are you for yoga or is yoga for you? Sounds like you discovered that yoga is meant to serve you, the practitioner, not the other way around 🙂 Imagine the possibilities… 🙂
Great post! I am trying to give my students the intent of the pose more often, in the hope that they will really start to pay attention to their bodies and whether that is what they are feeling.
In Bridge Pose, you will become more alert in both body and mind. The way you explain this yoga steps is superb. Keep it up!!
Olga, on-line courses taught by you will be fabulous! Uh, what topic….. I’ll think about it and let you know in my future comments!