
5 ways to forgo the benefits of yoga poses (release valves part 1)
11During my very first (weekend-long) yoga teacher training we were taught to “swan dive” – bend forward from the hips. I have a lot of mobility in my lower back, so I ended up exaggerating my lower back curve a lot; and since nobody had corrected me, carried this pattern into many other poses. Then, all of the sudden, my back started hurting. What was that about? I went to see another, more experienced yoga teacher who immediately identified my dysfunctional movement pattern. I had to retrain myself in many different poses and as a result, got rid of the back pain and acquired a much stronger core.
This problem is very common in yoga, and is an example of what we call a “release valve.” Release valve is an unfavorable pattern of movement that your body adopts to avoid working certain areas. It also means that you will miss out on all the benefits of the pose and reinforce existing movement patterns, even if they are not serving you. Release valves can show up for a number of reasons:
- Stiffness and limited range of motion that prevents you from doing the full form of the pose
- Excessive mobility that causes you to “collapse” into the posture
- Lack of clarity about what the pose is supposed to accomplish
- Improper training (stemming from the teacher’s misunderstanding or neglect)
Today we will discuss some of the most common release valves and what we can do to correct them.
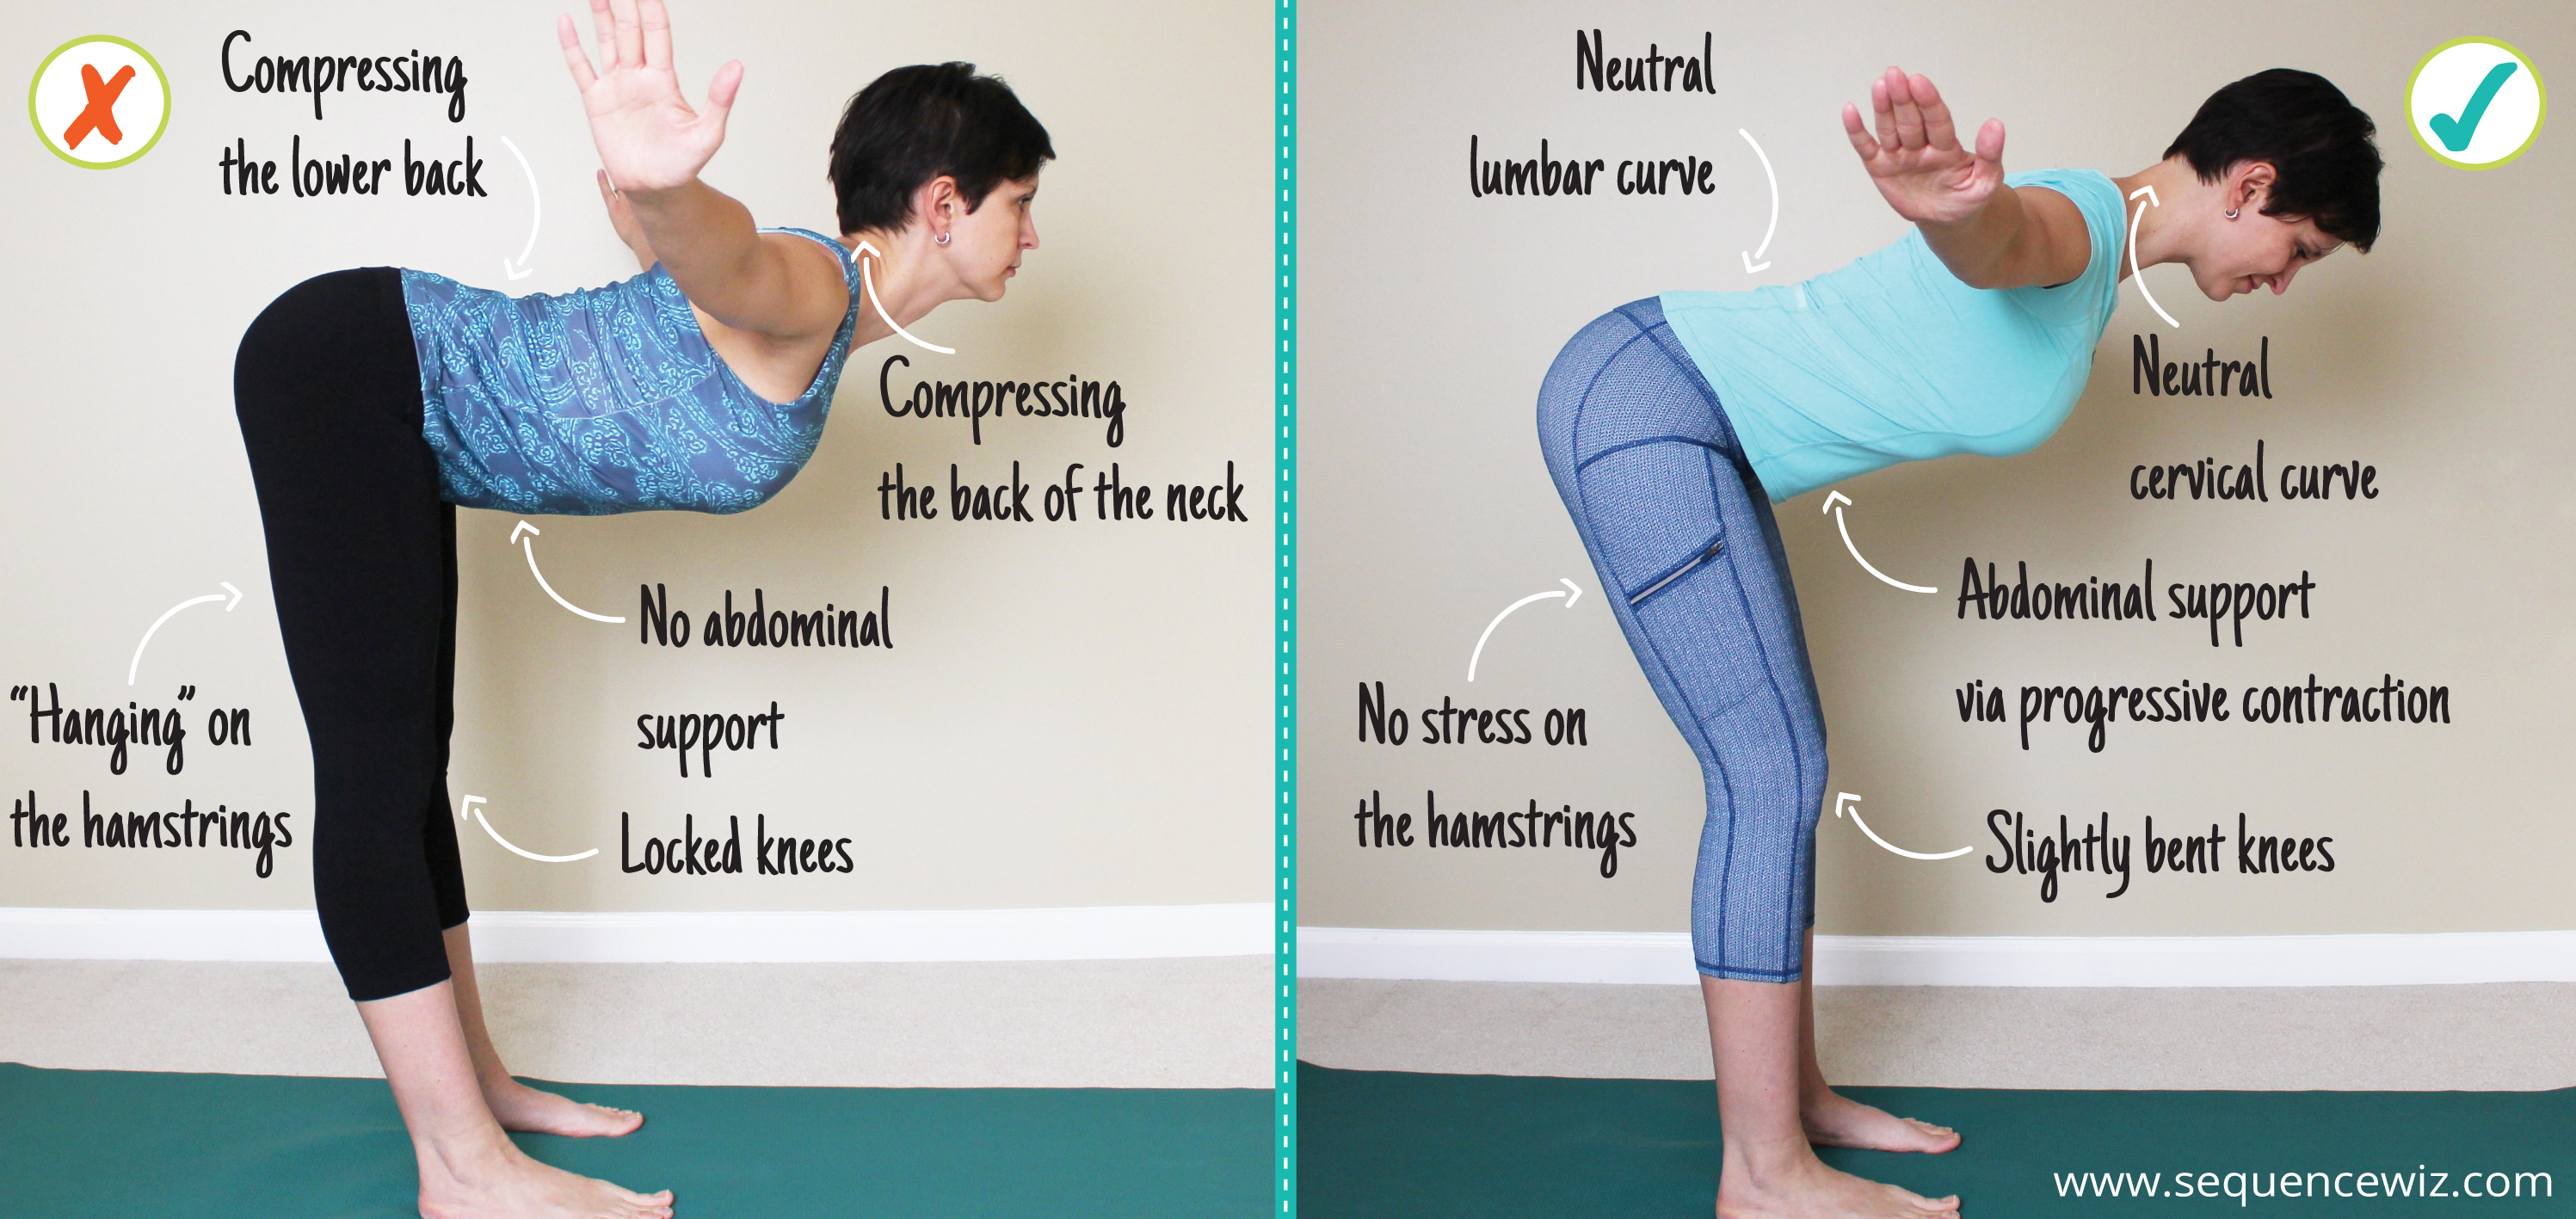
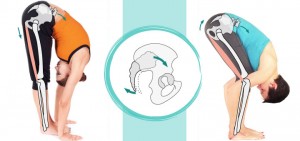
1. Exaggerating the lumbar curve

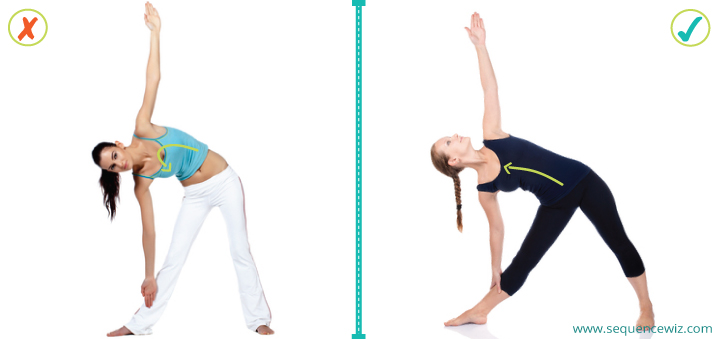
This is common for practitioners who have a lot of mobility in their pelvis. It concerns the relationship between the pelvis and the lumbar spine (and is called pelvic-lumbar relationship). Having a healthy pelvic-lumbar relationship is essential to the health of your lower back and the strength of your core. It protects and stabilizes you in virtually every pose; without it your top half becomes disconnected from the bottom half. If you have not developed a habit of progressively contracting your abdomen on the exhalation (we call it a “zip up”) while practicing, your pelvis is likely to tip forward in backbends, forward bends and even side bends. Potential consequences include lower back pain, a weak core, lack of overall stability.
SOLUTION: Zip it up! (Learn more about zip up reasons and technique)
![]()
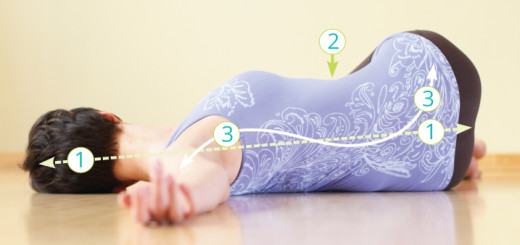
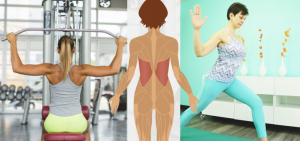
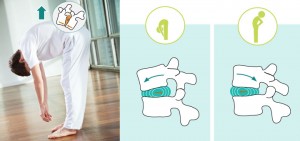
2.“Hanging” on the joints
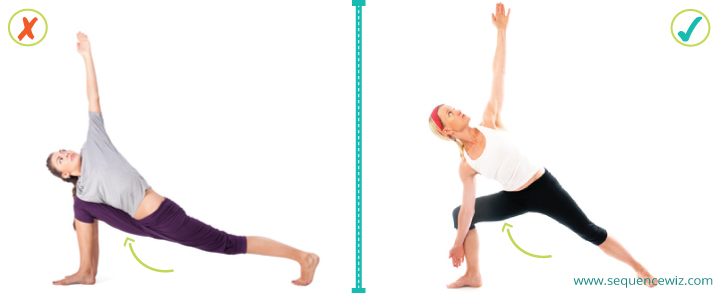
Every yoga pose requires a delicate balance between strength and flexibility. If a practitioner has loose joints, her flexibility/stability scale is usually tipped toward flexibility. This means that instead of engaging the muscles to work the pose, she can instead rely on her joints and just “hang” there, bypassing the work. Consider the image above. The first practitioner in her effort to keep the hand on the floor is dipping too far in her right hip. Once your thigh moves down past parallel to the ground, it’s harder to engage the leg muscles, so you end up relying on your joints instead. One of the goals of this pose is to strengthen the muscles supporting the hip joint; if you practice the pose the way she does, you destabilize the hip instead. (Read more about stability vs mobility in the hips).
SOLUTION: Engage the muscles (by pressing the foot down) and lift out of the “dip” (so that the thigh is about parallel to the ground). Put the hand on the knee or a block instead.
![]()
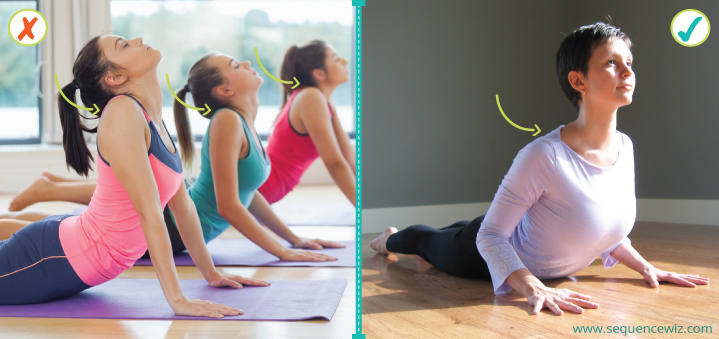
3. Sticking the chin up
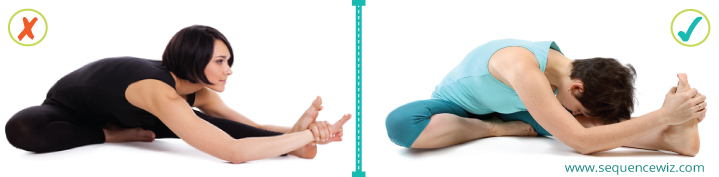
Some of us are in a habit of lifting the chin up all the time. It usually happens because of habits, chronic tension or because we’re trying to keep an eye on what’s going on around us. If you do it consistently, you will create tension in your neck, instead of relieving it. Is that why we come to a yoga class? I don’t think so. (More info – 6 reasons your yoga practice can become a pain in the neck).
SOLUTION: As a general rule, we want to keep the cervical spine and the head in a neutral position, unless we are working with the neck specifically.
![]()
4. Shrugging the shoulders toward the ears
This is probably the phrase that I say in my yoga classes most often: “Relax your shoulders”. In fact, some students tell me that they hear it in their sleep. Shoulders climbing up toward the ears is a common response to stress, lack of movement and computer work (read ”modern lifestyle”). It is not surprising that we carry this pattern into our yoga classes. One of my students calls her shoulders “my handy little helpers” because whatever we do, her shoulders are always eager to “help”. Yoga class is a perfect place to deal with this pattern and try to overcome it.
SOLUTION: Relax your shoulders! First step is, of course, noticing that you are tensing them. Once you gain this awareness you can begin to work on consciously relaxing the shoulders when the pose doesn’t call for their participation, and engaging them without tensing when they are involved.
![]()
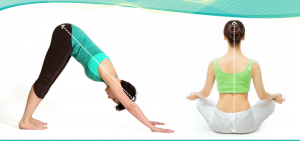
5. Collapsing the chest over the belly
Over the course of the practice we usually take the spine through the full range of motion: bending forward, back, sideways, twisting and lengthening. If your spine or supporting musculature does not allow for a deep side bend, for example, the compensation pattern would be to collapse the chest to turn it into more of a forward bend. This also happens if the student has kyphosis (exaggerated thoracic curve), for example, or just an overall tendency to slouch. If you fall into this pattern, you will be missing out on all the benefits of the postures that you are attempting, while at the same time compromising your spine and your sacrum.
SOLUTION: Lengthen up! Imagine lengthening your spine and moving the chest away from the navel. Oftentimes you will need to limit how far you go into the pose or use a prop, which is perfectly fine and will be more beneficial for you then forcing your way into the pose with a collapsed chest. Strengthening your upper back muscles is also very useful.
These are some easy changes that you can implement and avoid the risks associated with these release valves. There are, of course, many other ways your body can avoid doing what you ask of it. That’s why we need to stay present and alert when we practice. And having a knowledgeable teacher to keep an eye on you is super important, too!
Read Part 2 of this post >
![]()


Hi Olga, I wanted to tell you how much I appreciate the thought and well-informed experience evident in your blog. In every instance, you are spot on.
I haven’t met up with Gary K. in years, but consider him a major influence. Watching students strive (myself included) over the years continues to reinforce the wisdom of his approach to the practice.
Happy holidays, and thank you so much for your posts.
Susan Ulery
Thank you Susan! Student’s ability to thrive is the biggest testament to someone’s approach, isn’t it? I see it work for students of all ages, interests and physical abilities – what more could we want? Thank you for your insightful comment and your kind words about my blog. Happy holidays!
This post is genius! Feel the love! Almost everyone at my studio struggles with pain and injuries. I can’t help but think it is because so many of our teachers push students to make certain shapes regardless of each student’s unique structure or abilities.
Thank you for your comment Colleen. This “pushing” thing always makes me so sad. It becomes more about the idea of yoga, then the actual practitioner.
Olga,
Brilliant tips! In yoga it is so important to keep practicing in the right direction because the wrong direction can just lead you off the practice!
For months I am going to yoga class almost daily, and am trying to make a strong effort to be more aware of when these mistakes happen. It’s just that I find it so difficult, especially with no mirrors around, to bring awareness to which points are positioned wrong because it feels right. It is even more difficult because, as you said, it is almost like retraining from square one. Do you recommend to basically hold in the core for every move then? 😛 And how long could it take to undo and re-do a familiar move?
Again, thank you very much for the helpful pointers! 🙂
Hi Tanisha, thank you for your comment! You are so right – it’s often hard to identify our own habitual patterns because they feel perfectly normal. One of my students even has a phrase for that: when I ask her if something feels normal, she says “yoga normal”, which means that left to it’s own devices her body would do something totally different, but now she knows better. That’s why an extra pair of eyes of an experienced teacher is so important, to help you get to that place.
Out of all the things mentioned in the post the best one that you can do for yourself is to practice progressive abdominal contraction. In the course of the practice every time you exhale gradually contract your abdomen from the pubic bone toward the navel, just like you do when you put on a tight pair of jeans. On the inhale gradually release the contraction from top to bottom. It requires a lot of concentration at first, but then it becomes second nature. Also, starting in March we will be discussing some poses in detail to help you understand why and what we do there. If you sign up for our newsletter, you can join us in this exploration. Best of luck!
Thank you so much for this informative and insightful post. I plan to put it to work immediately. Having a moderately degenerated L5 and SI joint issues from a leg length difference, I found “swan diving” created more and more pain until I could hardly do a forward fold. I feel encouraged for the first time in a long time. I’m in the middle of YTT right now and am grateful for your direction so that I can relieve my own pain and not cause harm to others.
Any tips you might have for SI joint pain (and many, many people in my classes are complaining of this problem) would be very helpful.
Wishing you a glorious and joyous New Year.
Thank you for your comment, Janis and good luck with your YTT! I bet you are like a sponge right now absorbing all kinds of new things 🙂 I do have a blog post on the SI joint, have you seen it? http://sequencewiz.org/2014/02/20/too-many-asymmetrical-poses-can-create-sacroiliac-joint-issues/ I should really put together a practice to show those ideas in action. What I find more and more often now is that SI joint ends up being the recipient of the imbalances that happen in other parts of the hips, particularly in the abductors and hip flexors. So working on strengthening those and relieving chronic tension there is super important. Here are more blog posts on those parts of the hip with some suggestions and links to the practices: http://sequencewiz.org/2014/05/07/hip-abductors-hip-adductors/ and http://sequencewiz.org/2014/04/30/stretch-the-psoas/ I hope this helps!
Hi Olga, I want to make sure I’m understanding you, regarding anterior pelvic tilt. Should we avoid/minimize anterior tilt -by contracting the transvers abs- in ALL poses? I think my pelvis often tilts forward — in vira 2, in prasarita padatonasan, in forward bends. But I only noticed it when I just did all the poses with my hands on my hips. When is the anterior tilt appropriate and when isn’t it? Can you point me to other resources on this? Maybe this is why my low back hurts sometimes…Thank you!
Hi Debbie! The trick here is the CONTROL of the pelvic-lumbar relationship; basically using your abs to control how much your pelvis tips forward. Yes, it is applicable in every single pose we do. If you have a tendency to exaggerate your lumbar curve, it usually indicates an imbalance between the abdomen and your lower back muscles, and it can certainly contribute to your lower back pain. You can check out this article I wrote specifically about this issue here: http://sequencewiz.org/2013/06/21/how-to-protect-your-lower-back-and-increase-stability-in-any-yoga-pose/ ; here is how we do it in forward bends: http://sequencewiz.org/2015/03/18/how-to-bend-forward-without-stressing-spine/ and we will continue to explore how to do it best in back bends, side bends and twists. Stay tuned!
Very good info on yoga