Corset vs pelvic tilt: to tuck or not to tuck the tailbone under
5Couple of years ago Judith Hanson Lasater posted this on Facebook: “Stop tucking your tailbone! We are designed for and function best with a lumbar curve and a diagonal line to the sacrum. Jai!” She got a lot of responses like “Yes yes yes!!!!” and “Hallelujah!”, but many people were also wondering – why not? If you asked me whether or not we should tuck the tailbone under, I would answer in a true viniyoga fashion – it depends! Here is why.
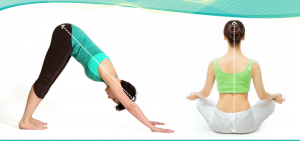
Most of us have a lumbar (lower back) curve and we have it for a reason – it helps to distribute the weight of the spine and other structures connected to it within the gravitational pull. Some of us have more pronounced lumbar curves, and some less pronounced. The degree of the curve reflects how much your pelvis is tilted forward.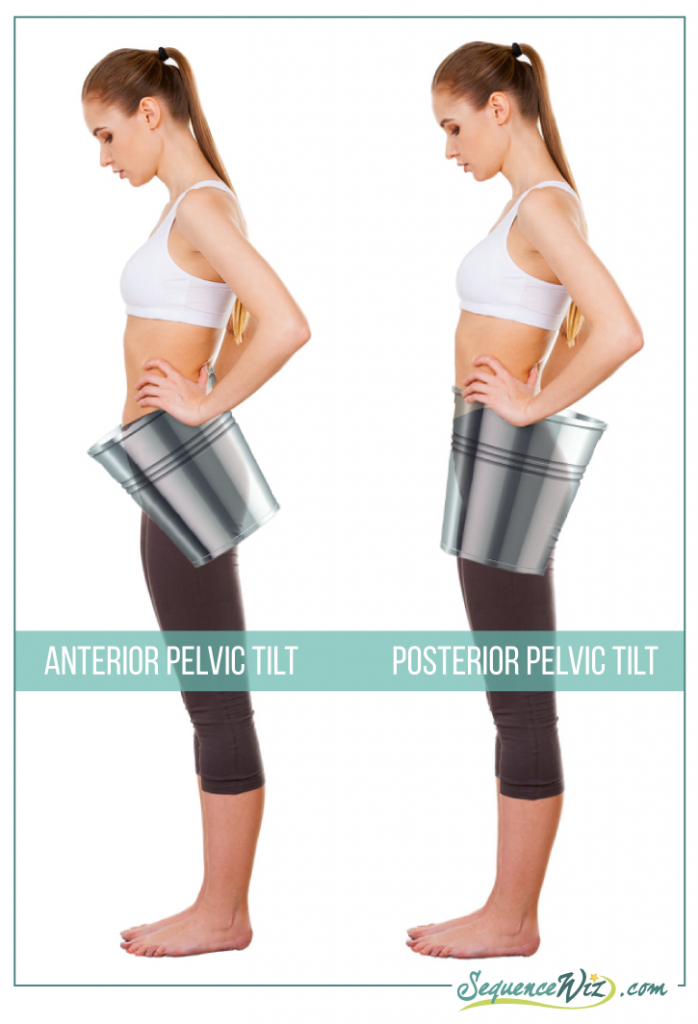
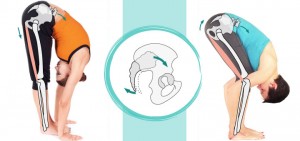
Try this: stand tall and place your hands on your hips. Imagine as if you are holding a bucket of water. On the inhale try to tip the pelvis forward as if to spill the water in front of you, notice how far it goes. On the exhale tip the pelvis backward as if to spill the water behind you. What you are doing here is assessing the degree of the anterior (forward) and posterior (backward) pelvic tilt. The range of movement here will differ from person to person, so you will end up somewhere on the spectrum between the tin man (stability) and a noodle (mobility). And just like in most other body areas the extremes of that spectrum are not preferable – you need to be both stable and mobile.
When we talk about developing and maintaining a healthy relationship between the pelvis and the spine, there are two main ways to approach it – “the pelvic tilt” and “the corset”.
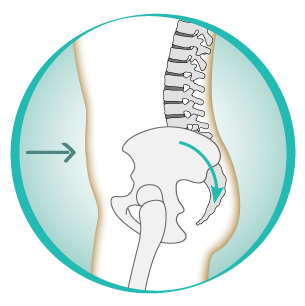 The pelvic tilt means using progressive abdominal contraction to tip the top of the pelvis backward, which will result in the tailbone tucking under. We usually use the pelvic tilt to bring student’s awareness to the position of her pelvis, as well as develop and maintain mobility in the lumbar spine. It can be done in a supine position, in kneeling or standing.
For example, in a supine position: lie on your back with knees bent and then on the exhalation pull the navel in toward the spine. The natural result of that will be a posterior pelvic tilt and the tailbone will tuck under (click on the image to play the video).
This kind of exploration can do the following:
– Increase your general awareness of the movement of the pelvis
– Teach you to move the pelvis by contracting the abdomen, not the glutes (butt muscles)
– Demonstrate the relationship between the muscles of the abdomen and muscles of the back (when the abdomen is contracting, the lower back is stretching and visa versa)
– Give you a chance to practice progressive abdominal contraction on the exhalation.
These are all worthy goals and can significantly increase your body awareness.
Or in a kneeling position: when you do a Cat-Cow movement and round your back on exhale, once again you are pulling the belly button in toward the spine which will result in your tailbone tucking under. Since your goal here is to alternate contracting and stretching of the lower back muscles, this kind of spinal flexion is fine, as long as you focus on lifting the chest on the inhalation (rather then overarching the lower back) and progressive abdominal contraction on the exhalation (rather then tensing the glutes). This feels good to most students and helps them to warm up their backs.  Or in a standing position: when you are doing Virabhadrasana 1, for example, progressively contracting your abdomen and tucking the tailbone slightly will help you become more aware of the relationship between your pelvis, your abdomen and your spine, as well as get a better stretch in the hip flexors (click on the image to play the video).
These are the examples of when tucking the tailbone under is a natural result of a progressive abdominal contraction that initiates a posterior pelvic tilt. It makes sense then to direct your student’s attention to the gradual abdominal contraction rather then the tailbone tucking, even though those two go hand in hand. This can be an excellent teaching tool to build student’s awareness about the relationship between the pelvis and the spine.
 The corset, on the other hand, means hugging the waist in toward the center as if you were tightening an invisible corset around your torso. It is a similar action of progressive abdominal contraction, but here no visible change occurs in the position of your pelvis and the lower back remains neutral. This is a preferable method for creating and maintaining stability in your core and is useful in any yoga posture. So if you are in Ardha Utkatasana, for example, instead of tucking the tailbone under you would want to focus on hugging the waist in all around so that you maintain your natural lower back curve and create support for your lumbar spine (click on the image to play the video).
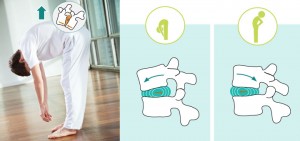
Quite often the tucking of the tailbone under is done with the idea of correcting the excessive lower back curve, either in a yoga posture or simply in a standing or seated position. This is understandable, but then we are running the risk of overcorrecting and flattening the lumbar curve altogether. This kind of thinking (“My pelvis tips forward a lot, so I will just tip it back to realign it”) is reflective of a very mechanistic approach to body alignment and often leads to replacing one dysfunction with another. In a situation like this your body is much better served by learning the corset action which will help create more stability in the core and, in turn, will help your pelvis lend where it needs to go. We have a lumbar curve for a reason, we don’t want to loose it; instead we want to support it. The support comes from the conscious “corset” action, which also helps to position your pelvis in its proper location.
To sum it up: if your goal is to increase awareness of the progressive abdominal contraction and create more mobility in your lumbar spine, pelvic tilts work great for that. It is usually a great first step in preparation for the corset, which is more effective for creating stability and support, but can be difficult for newcomers to grasp and feel. Once the students grasp the idea of progressive abdominal contraction, it is a good idea to make a habit out of engaging the abdomen with every exhalation when you practice.
Step 1 – Creating awareness of the abdominal contraction with the pelvic tilt
Step 2- Creating awareness of the abdominal contraction without the tilt
Step 3 – Using abdominal contraction with every exhalation during practice (with or without the tilt depending on the posture).
It is not necessary to engage your core all the time in your daily life, only when you lift heavy things, push, pull, throw, etc. Why? We will talk about it next time. Tune in!









Thank you for sharing your post, Olga. Although I wasn’t a Facebook user when Judith posted her comment, I’ve long enjoyed her in-depth knowledge as a yoga teacher and physical therapist. I’m an advocate of core awareness and engagement during all asana practice. My students may occasionally tire of reminders to contract from their lower abdomen upward, but they quickly provide positive feedback about the benefits they experience from practicing with this focus. Most say they find the greatest challenge is not inadvertently tensing their respiratory muscles at the same time they engage the muscles of their perineum. When they learn to engage properly, they begin to understand that mula bandha is not simply a lock to dam energy outflow but also a bridge to unite pranas. I’m always seeking to increase the depth and breadth of my knowledge, and your posts are a great resource and supplement to ongoing training. Thanks again. Make today a great “hump” day! Many blessings,
Suzanne Harrington, RYT-500
Certified by Himalayan Yoga & Meditation Center
(262) 903.9022, phone
Ever On Yoga Owner/Operator
Ever On Yoga on Facebook
“You are the architect of your life, and you decide your destiny.” Swami Rama of the Himalayas
Fantastic article!!!!!!!:D
Thank you for all the things you write!!!
Hi, Olga,
It seems possible to strike a rule of thumb: back-bend is inherently connected with tucking the tailbone in, forward bend looks towards APT. Both cases stem from the intent to prevent the unwanted impact of either type of bend on low-back. SURELY this is a dashed guide line only, with an infinity of refinements, but still it can be useful if applied with care.
The “corset” is a much more sophisticated “device”. Utkatasana is a very good example of using it, because it requests the change of a position of the torso in space without changing its structural form. But to explain the action of simultaneous drawing in of a whole muscle belt is much more difficult to an ordinary student, especially in his advanced age.
Thank you for this post. I’ve been working on this for some time now. I had a conversation with one of my favorite instructors who said he doesn’t like seated forward bends and seated twists. He feels most find it difficult to maintain the natural S shape of the spine. He said to maintain the S shape the pelvis needs to tilt forward which should bring the perineum to the mat. I am now working on this as well of the mat as well to create more space in the spine and keep from collapsing into my pelvis.
In a world composed of movement, I sometimes wonder why we are so keen to subscribe to concepts that unquestioningly adhere to fixed postures. Exercise programmes should explore flexibility and range of motion to encourage motility and the body’s innate intelligence. Challenging physical patterning laid down by habit, misuse and preconception stimulates muscle memory to reorganise, and frees both body and mind.
‘It depends’……excellent article, thank you!